Mary's Rules Corner header

In July’s Rules Corner, we talked in depth about how to take relief from a Yellow Penalty Area. Thanks to Laura Borja, we had lots of graphics to help you understand how to take “Back-on-the-Line” relief for a Yellow Penalty Area.  This month, we’re going to talk about relief from Red Penalty Areas.

A HAZARD BY ANY OTHER NAME IS….

Prior to 2019, the rules referenced “water hazards” (marked yellow) and “lateral water hazard” (marked in red). These hazards had to contain, or potentially contain water to fit the definition.  

In 2019 the USGA recognized that there were other situations where relief options were appropriate.  And so, the Red Penalty Area (RPA) was born.  

Under Rule 17, The Committee has the power to decide what areas will be defined as an RPA.

Penalty areas may therefore include areas such as deserts, jungles, lava rock fields, etc. For Torrey North and South, ALL canyon areas are defined as Red Penalty Areas.

IDENTIFYING RED PENALTY AREAS

Most of the time, an RPA is marked with a red line or red stakes.  In many places, Torrey has just a few red stakes to help identify the canyon area. So, what if there are no stakes and no red lines? What is considered the edge of the RPA?

Since all canyons at Torrey Pines are treated as RPAs, regardless of the presence of red lines or stakes, the edge is defined by where the canyon meets the grass. 

You don’t need to go in a straight line from stake to stake as you did prior to 2019. Just find where the canyon meets the grass and that will be the edge of the RPA.

USGA red penalty areas

YOUR RELIEF OPTIONS (Rule 17.1)

If a ball is in the RPA and cannot be played as it lies, then the player has the same two relief options as Yellow Penalty Areas
1) Stroke and Distance, or
2) Back-on-the-Line
PLUS one additional option, that you will use almost all of the time:
3) lateral relief by measuring two club-lengths from where the ball last crossed the edge of the Penalty Area, no closer to the hole
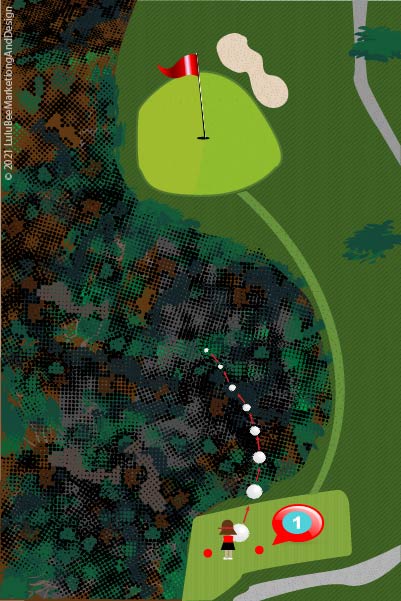
This USGA video link was provided in last month’s article to illustrate options on Torrey South, but if you didn’t see it then, here is it for another look:

Looking North

Let’s use Hole #12 on Torrey North to illustrate some of your options.

Red Penalty Areas TP North 12

Scenario 1

Your tee shot goes straight into the canyon, crossing directly in front of you

You most likely will use option 1 and tee it up and hit again.
Dropping two club lengths from where it last crossed would put you beyond the teeing are on that hole or on a severe slope that would make it very difficult to hit your next shot

Scenario 2

Your ball hooks (or slices in the case of a left-handed player) and goes into the canyon from the side.

You will still be able to take option 1 and hit from the teeing area again. However, in this scenario, the 2-club length lateral drop (option 3) might be a better option, particularly if your ball goes in at the bottom of the “dip” and you have a flatter lie.
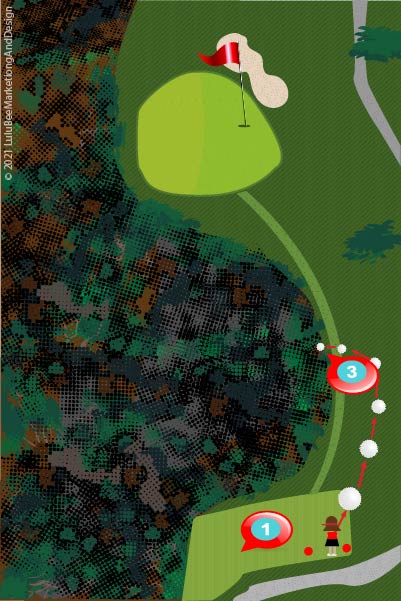
Red Penalty areas TP north #12

Scenario 3

Your ball makes over the canyon but rolls backwards crossing the edge of the canyon on the greenside..

Again, you have the option to tee it up again OR you apply option 3 and take a lateral drop within 2 clubs from where the ball crossed the RPA, no closer to the hole.

On most golf courses, Red Penalty Areas are much more prevalent than Yellow, and so it’s worth your time to know ALL your relief options so that you can play correctly from the spot that is most advantageous for you.

And one last thing to keep in mind: Option 3, lateral relief, is NOT available for a Yellow Penalty Area. That’s why we provided a lot of diagrams last month to show you how to properly take relief from the pond on Torrey South #18.

Any questions? Just let me know! rules@tpwgc.com

As always, let me know if you have any rules questions or want to see any topics covered in upcoming Rules Corners. See you on the golf course!